Tag Archives: Back Health

The Stiff-Legged Deadlift Must Die

By Dan Wagman, PhD, CSCS

I’m glad that Al’s article on the Romainian Deadlift (RDL) and Stiff-Legged Deadlift (SLDL) mentioned the dangers of the SLDL. Everything about the SLDL is contrary to proper lifting technique, biomechanics, and physiology-and as such increases injury risk immensely. And since we’re talking about the back, an injury there can be life changing and lifting career ending. Please let me explain…and I’ll do this as briefly as possible and in a step-by-step sequence.

A properly executed RDL reduces the risk of injury over the SLDL many fold. For one, a properly executed RDL allows the lifter to simply deadlift the barbell off the ground; this means that proper lifting technique can be employed before you even start doing a RDL. Then, as you commence the RDL, the barbell is slid down the thighs, over the knees, and about half way down the legs, while at all times remaining in contact with the body. This is achieved by keeping the back in a neutral position (flat) and by shifting the center of mass back toward your heels as much as possible. If you find yourself losing balance backwards and your toes popping up a bit, then you’re doing a proper RDL. By keeping the back flat and keeping the center of mass as close to the coronal plane* as possible, the shearing forces upon the lower back are minimized. Research on the squat has demonstrated clearly and unequivocally, how the more the center of mass moves away from the coronal plane (forward), by as an example doing a low-bar sq compared to a high-bar sq, shearing forces on the lower back increase many fold. (Certain dl comparison studies have demonstrated this, too.)

So what about shearing forces? Whenever you lift something, joints move, and shearing forces exist. But by observing proper lifting technique, grounded in sound biomechanics, these shearing forces are something your body can handle and adapt to so that they become a non-issue. And so in the low-bar squat, even though the shearing forces upon the lower back are greater than in the high-bar squat, since proper lifting technique can nevertheless be maintained, these forces don’t add up to an increased injury risk. Not so in the SLDL!

Some of the technique strategies necessary to reduce shearing forces upon the lower back when you lift is to bend the knees, keep the back in neutral, and keep the center of mass as close to the coronal plane as possible. This can all be achieved with every pull off the ground-except the SLDL. And what makes the SLDL particularly insidious is that execution of this lift requires you to violate all principles of proper lifting. And that’s why this lift must die…

  • Whenever the center of mass moves forward…you’re increasing shearing forces upon the lower back; you can’t do a SLDL with the bar close to the body.
  • Whenever you lift something with locked knees…you’re increasing shearing forces upon the lower back; this is one of the chief aspects resulting in a barbell away from your body.
  • Whenever you round your back, you’re taking the curvatures out of your spine, thus reducing the structural strength of the spine, thereby increasing forces upon all vertebrae of the spine…and you’re also increasing shearing forces upon the lower back; you couldn’t lift with neutral spine (flat back) even if you tried when your knees are supposed to remain locked.
  • Whenever you lift more weight…you’re increasing shearing forces upon the lower back; but in the SLDL this occurs due to poor technique that places anatomical structures (tendons, ligaments, discs, muscles, etc.) at additional risk by ostensibly weakening them.

Up until now I’ve withheld personal opinion and just shared scientific fact. But based on these scientific facts, my personal opinion is that if the IAWA Worlds had the SLDL as a contested lift, I’d only do a token lift with the minimum amount possible, even if that meant losing the worlds by 10 pounds. And not trying to pick on Al here, I would like you to consider that him having done SLDL’s for 20 years without injury is simply a function of luck. If I were him, I’d consider the facts of biomechanics and I’d stop doing SLDL’s now and thank Lady Luck every day that I made it through the mine field intact.

So now some of you might be thinking that, “Yeah, well, but the SLDL does help my deadlift by giving me more strength off the ground.” Guys, let’s be honest here, that’s just conjecture based on what came out of the “Golden Age of Lifting.” It can be argued that these guys gave rise to the field of exercise science. And now that it has advanced, we should not hold on to old and unproven myths, but embrace the advances in knowledge these guys laid the foundation for. So, sure, you might think that SLDL’s will help you get the barbell of the ground, because that’s what you feel. But what you’re feeling there is just an acute sense of what’s going on due to a new exercise-it’ll fade…and the feelings are not a reflection of reality. Research has shown that in an effort to get the barbell moving off the ground, you need more speed-not a violation of good lifting form and enough luck to survive that. So you’d be much better off training high pulls than SLDL’s to increase your pull off the ground. There’s a reason weightlifters tend to be great deadlifters…and it’s not because they do SLDL’s.

Overall, there is absolutely no reason to do the one lift that violates all principles of proper lifting. And as to being a contested lift in IAWA and USAWA…who cares. Is it worth the risk? At the end of the day, that’s your decision. I can only hope that you’ll be able to take the above as useful evidence to derive at a more informed decision. As for me, SLDL RIP.

*Imagine looking at a person from the side and dividing that person into equal halves front and back. The center line that divides front and back is the coronal plane.
Power Swings

by Al Myers

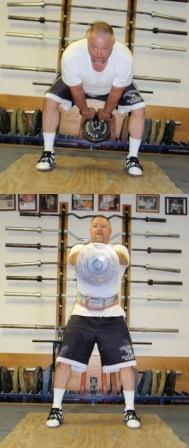
The top picture shows the starting position of a Power Swing, while the bottom picture shows the finishing position.

Another exercise that I really like to do after my heavy leg/back training is power swings. I have done this exercise “off and on” for many years. Years ago it was one of my favorite training exercises for helping my weight over bar.  The positions are just the same as throwing the WOB (standing style that is!), and builds quick explosive strength in the hips.  This exercise is easy to do.  Take a parallel stance with feet slightly wider than shoulder width. Grip the swing implement with both hands and swing it up to 90 degrees, keeping the arms straight. As the weight hits the peak, drive up the hips to a standing position.  Multiple reps can be done by allowing the weight to “sink between the legs” and performing another attempt without setting the implement down. I like sets of 10 reps or so.

This exercise can also be done one handed.  That is the way I use to train it when I was in throwing in the Highland Games. I felt the one-handed training more directly applied to the WOB.  However, now I prefer the two-handed style as I’m using it as a “finishing movement” to my heavy leg/back day.  I  use an adjustable powerstairs handle to add weight to.  Kettlebells also work well but they are more difficult to grip two handed. Years ago I made a full set of what I call SWING WEIGHTS (now swing bells, as that is another type of training implement) to use for training one-handed power swings.  They are fixed weight implements.

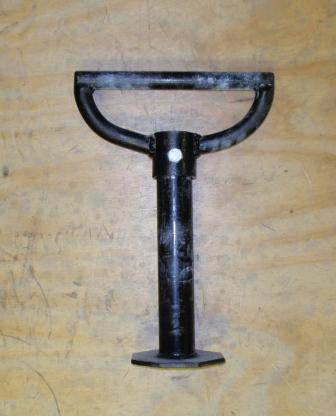
The Power Swing pin loader and attached handle.

The handle can easily be removed from this pin loader to add/remove weight.  All it takes is removing one bolt. The total height of this implement is 16 inches, which I feel is the perfect height to allow the weight to swing to a deep position. Performing 4 or 5 sets of 10-20 reps in 15 minutes at the end of your workout is all you need.  You will feel the work in your lower back and hip flexors.  I really do think these type of exercises following a training session of heavy deadlifts and squats “loosens” thing up, and speeds up the recovery process afterwards.  Of course, that is just my opinion.  But it will leave you “feeling good”, as this always works up a sweat and gives my a little cardio training to end a  good heavy workout.

Zercher Pull Throughs

by Al Myers

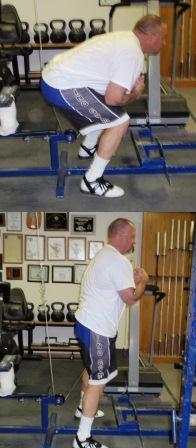
The top picture shows the bottom starting position of a Zercher Pull Through, while the bottom picture shows the finishing position.

I have written a blog before about how we “at the Dino Gym” do some light accessory movements after our hard Squat/Deadlift workout.  In that story I covered one exercise that we really like – the Rounded Back Platform Deadlift.  Look back in the blog archives to refresh your memory of that lift, as it is an excellent “finisher movement”.   The purpose of these exercises is NOT TO BUILD STRENGTH (as hopefully your heavy training in the session up that point has already done that), but rather, to “wind down” a workout with an exercise that will increase the blood flow to the lower back and hips, and aid in the recovery process.  I also like doing these movements as it is mentally refreshing as well.  Up till this point the entire workout is about going ALL OUT, and then you get to “change gears” and do a movement that is not strength demanding to finish off the night, but instead stamina demanding.  I’m not saying these movements are EASY though, sometimes they can leave you quite worn out.   I’m not a big fan of high reps to build strength as I’ve never had success with getting stronger by training high reps.  In my heavy stuff I never go over 5 reps, and most of the time it is 1-3 reps on lifts.  But with these “finisher” movements I like to hit lots of reps – like up to 20 or so.   I keep the rest short in between sets and do 3-5 sets total.  It will leave you breathing hard as well!   All the time you need to allot for a finisher movement is 15-20 minutes.  Not a big commitment time wise – most guys spend more time than that packing their gym bag up after their workout.

Now onto the Zercher Pull Throughs. Pull Throughs are a popular exercise for lifters.  The movement focuses on the lower back and hips.  I have done them several different ways – with straps around the arms, ropes to the hands, etc.  But the way I like them BEST is doing them Zercher style.  I have not really read about anyone else doing them these way, but I’m sure others have done them this way as well.  So I’m not presenting this movement as something original by me, but rather describe how I do this movement and why I like it.  I perform this exercise using my lat pull.  I have a low pulley that mounts below the seat that is used for the low lat seat.  I attach a cable through this pulley to a short bar handle.  The cable is the length that allows me to position with the bar handle in the crooks of my arms in a low stance (as demonstrated in the picture).  I lean slightly forward and thrust upwards, extending the hips and straightening the legs.  I lower slowly, and at all times keeping tension, and then do another rep.  There is never a break in the action during these high rep sets.  Use a weight that forces you to work hard but not cause a break down in proper form.  Focus on maintaining proper breathing and just “feel the burn” in the hips and lower back as you add reps!  It is a very simple movement. 

Why do I like these Zercher Pull Throughs more than other types of Pull Throughs?   Like I’ve said, I’ve tried all types and even have special straps made to do them other ways.  I would like to say the reason is because I just love Zerchers so much as that is the reason, but in truth, it comes down to TWO REASONS that have nothing to do with loving the Zercher Lift.  The number one reason is that these Zercher Pull Throughs takes all stress of the arms and shoulders. Other Pull Throughs require you to be holding a strap of some kind in front of you.  This puts pressure on the arms and shoulders, and makes those muscles come into play enough that they become the limiting factor in the exercise, and not the hips and back as it should be.  Reason number two is kinda personal, lets just say a strap being rubbed continuously between the legs can result in friction burns to any body part in the vicinity.   That’s not a desirable thing in any type of exercise!

Rig up your lat pull machine to give this exercise a try.  I assure you that you will be impressed!

Watch Your Back!

by Jarrod Fobes

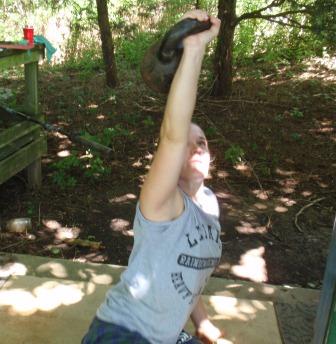
Amber Glasgow, of the Ledaig Heavy Athletics Club, performs a Turkish Get Up with 35 pounds. The Turkish Get Up is a great exercise to strengthen muscle imbalances in the back.

Injuries have shaped a lot of my training, and there is nothing that will get you thinking more about how you train than an injured back. Bum knee? Work your upper body for a while. Injured shoulder? Train around it. Hurt your back? You won’t be in the gym for at least a few weeks. After my last back injury I got busy researching back health and learning what I could do to prevent any future relapses. From what I’ve learned, spinal “prehab” can be distilled down to two major factors. Here’s what they are and what you can do about them.

Muscle Imbalances

Muscle imbalance refers to any break in the symmetry of the muscular system. You don’t want your right side stronger than your left, or your front stronger than your back. Most of you have heard that to protect your back, you should strengthen your abdominals. Strong abdominals are important to provide a counter to the powerful muscles of the lower back, but they are only part of the equation. Is your left hip flexor stronger than the right? Then your hip may be pulled down on the left side, and your back will struggle to compensate for it. Are your hamstrings disproportionately stronger than your quads? That may have an effect on the stability of your knee. If your knee goes out, your hips may start compensating for your injured knee. From there the chain of compensation can easily reach your back.

Fortunately there are two exercises that are terrific for correcting major muscle imbalances. One is the Turkish Get-up, already and official USAWA lift. The other is the One Legged, One Armed Deadlift.

If you are balancing on your right leg, you will grab the weight with your left hand. Put a slight bend in the knee of your support leg. As you lean forward to grasp the weight, your non-support leg should rise up, keeping in as straight a line as possible with your back. Maintain that alignment as you stand up with the weight. As with any deadlift, don’t let your head droop forward.

Both lifts should be trained heavy, but not to failure. Within a month or two diligently giving each side of your body equal work with these lifts, you should have corrected the major imbalances in your body. But stay on guard against overworking one side or the other in day-to-day life too: if you ride a bike, don’t always push off with your dominate leg. If you carry a kid around, make sure you use both sides of your body for roughly equal time. You get the idea.

Muscle Endurance

Muscle endurance is the ability of a muscle to work for a prolonged period of time. It is related to, but separate from muscle strength, which most of us focus on in the gym. Many of us have strong backs, but inexplicably still have back problems. That’s because while we may be able to lift enormous loads with our backs, we haven’t conditioned them to handling sustained, symmetrical loads. Just as being able to do 100 push-ups may not translate into a huge bench press, heavy deadlifts do little to condition our backs to prolonged work. That is why kettlebell swings are so important.

Stand with your feet about shoulder width apart. You should have about a 90-degree bend in your knees, as well as at your waist. Do not let your back round, and keep your head up. The kettlebell (or whatever implement you decide to you use) will be in both hands tucked under your behind. Your wrists should rest on your inner thighs.

From this position, explode forward with your hips, extending the legs and back. The weight should stop at 12-o’clock, directly over head with your arms straight. A common mistake is to initiate the movement with the arms. The explosive hip extension should provide the momentum to get the weight moving. Guide the weight back down to the starting position, and repeat.

Since we’re focusing on muscle endurance, execute a high number of reps, at least 75. Focus on maintaining a high rep speed, too. This will mean starting with a lighter weight than most of us like to be seen with in the gym, but do it anyway. If 75 is too daunting, start with 3×25, and “steal” reps from the last set and give them to the first in following workouts. So following rep schemes might look like 35x25x15, 50×25, etc until you reach 75 reps. Once you can handle 75 you have the option of increasing weight or increasing reps. Besides muscle endurance, my posture has improved greatly since adding kettlebell swings to my routine. I recommend them to anyone whose shoulders roll forward. Another benefit of this exercise is the tremendous cardiovascular work it provides. If done with speed, explosiveness, and adequate weight, your heart will really be pumping by the end!

Taking Care of Your Back – Part 3

Part 3 – Have Strong Abs

by Al Myers

Training the abdominal muscles is often overlooked by weightlifters.  Bodybuilders usually go overboard with ab training because they are in search of the perfect 6-pack.  Us weightlifters are just as happy having a perfect keg instead. I learned in college during a physiology course that opposing muscle groups should be of comparable strength in order  to prevent injury due to muscle imbalances.  That hit home for me in my training.  It is easy to overlook less important muscle groups because they don’t seem to be “the  major players” needed in a certain lift.  Think about this, and I’m going to use Powerlifters as my example. Are most Powerlifters upper back as strong as their pec and front shoulder muscles?  Are their hamstrings as strong as their front quad muscles? And are their abs as strong as their back?  I would say usually not because the first muscle groups is not directly involved in the strength of the three powerlifts as the second muscle groups,  with the result over time leading to muscles strength imbalances,  setting up the possibility of injuries.

I’m a real believer in ab training in order to keep your back healthy.  I also believe the abdominal muscles should be trained like any other muscle group.  Too many lifters make the mistake of thinking the ab muscles are different somehow. These lifters  will do sit-ups or crunches EVERYDAY, and wonder why they are not getting stronger or building more abdominal muscles.  They will train with repetitions in the 100’s on these movements and wonder why it isn’t working.  Would these same lifters even THINK training the squat or deadlift like that would improve their strength??  I train my abs once per week – and train them hard and with low to moderate reps, just like any other exercise.  I do sets and rest between the sets like any other muscle group.  I like variety in training the abs, and have over 25 exercise that I will train (not in the SAME workout) in a random fashion.  I also pick ab exercises that don’t put undo stress on my lower back on my Thursday workout, as that would defeat the purpose of this “active recovery” day for my back.  When I was training for the 1000 pound Roman Chair Sit-up that I did a couple of years ago it was not on this day!  It was on one of my back days. This would also apply to other All-Round ab lifts  like the Roman Chair Bench Press.  I have my ab exercises grouped into three categories – light, moderate, and heavy.  I do one exercise from each group, starting with the light ab exercise first, then the moderate ab exercise,  and finally the heavy ab exercise.  I try to spend 20 minutes per exercise, so my entire ab workout can be accomplished in 1 hour per week.  My abs are always sore the next day after this workout.  I don’t do more than 10 reps per set on any exercise.

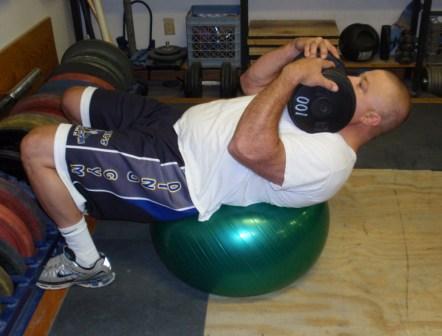
Al Myers performing a Front Ab Raise with a dumbbell on a Stability Ball.

One of my favorite ab exercises is an exercise I have called the Front Ab Raise on the Stability Ball.  OK – I admit I have one of those silly stability balls in my gym that have been popularized by Health Clubs across the country!  At first, I thought those balls seemed like they wouldn’t be of any value to a Hard-Core lifter like myself, but I always like to “test things out” before I form an opinion.  I found that using a Stability Ball with this exercise will put a heavy strain on the abdominal muscles and at the SAME time put no stress on my lower back.  I have a couple of other ab exercises I train using the Stability Ball – the Allen Lift (bar extended at arms’ length)  and the Abdominal Raise (bar behind my neck), but the Front Ab Raise is my favorite.   My advice for the heavy lifter is to buy the strongest Stab Ball you can find, and plan to replace it every 6 months.  The plastic will degrade with time and weaken the ball.  The forces I put on a Stability Ball is probably more than someone using it for general fitness  (often supporting myself at 250# and dumbbells over 100#s).   I have not had one “pop” on me yet, as I’m sure this amount of weight exceeds the ball’s rating,  but I always replace the Stab Ball if it is worn in any way.

Coming tomorrow – Part 4, Reverse Hyperextensions

1 2