Category Archives: USAWA Daily News

A good POWER RACK is hard to find

by Al Myers
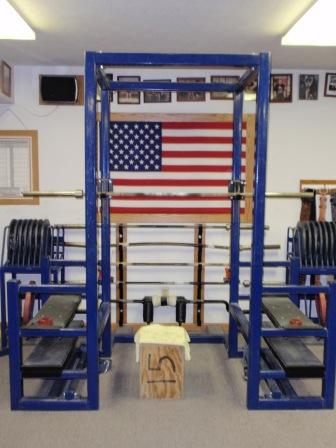
This is the custom-built Power Rack in the Dino Gym, which I made many years ago. It has many unique features (like hydraulic jacks attached to the bar hooks for easy adjustment of a loaded bar) that benefit lifters and lifting!!

I’ve spent a good part of my adult life in the gym training, and with that experience comes exposure to many different type of power racks.  Some good, but most have deficiencies in my opinion.  There always seems to be some feature that is less than optimal on each one I have used.  But Power Racks (or often called Power Cages – same thing, different name) have come a long ways since the early York Cages or Iron Man Power Racks.  I consider a good power rack as the SECOND MOST IMPORTANT piece of equipment in a gym (behind bars and plates).   A good power rack is the centerpiece of any serious gym, and often the most used piece of equipment in a free weight based training facility.  Up to 50% of my training time is spent in the “rack” each week doing a multitude of different lifts.  Having a good power rack to fulfill your training objectives goes a LONG WAYS to making continued strength improvement.  Today I’m going to go over power rack features that I feel are very important in having the ultimate power rack, from most important to least important. 

1.  Sturdy construction and Size

There are many racks on the market made out of lightweight tubing, with bolt-on construction.  A Power Rack should be heavy duty and not “bouncing around” every time a squat is racked in it.  A frame made out of at least 2.5″  11 gauge square tubing is necessary.  Also – the side frames should be welded and not bolted together.   Most commercial racks that are sold will use bolt-on construction to minimize the shipping costs – but in turn will cause inherent weaknesses in the power rack.  Bolts will loosen up with time, and bolted construction allows “wiggle room” in the joints.   Depth of power racks is also important to give plenty of room for lifting.  The depth of a power rack should be at least 36 inches.  The power rack should be high enough to not interfere with any type of overhead lifting you want to do – but this is often limited by ceiling height.
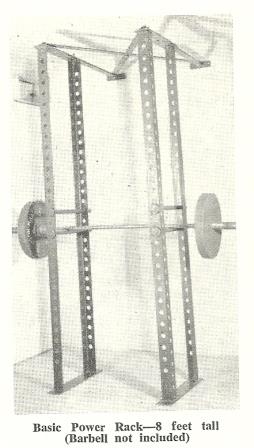
Power Racks have come a long ways since this "top of the line" power rack advertised in a 1966 issue of Iron Man.

2.  Bar Hooks (or J-hooks as they are normally called)

I think the bar hooks (which holds the bar in the power rack) either “makes or breaks” a good rack.  They are the most functionally used piece of the Power Rack, and should be of the highest quality, yet often good racks have junky bar hooks.  A bad bar hook will be an ongoing frustration and will soon completely overshadow all other aspects of your power rack.  Most bar hooks are made by utilizing bending, which often gives an inconsistent product.  Most  bent- type bar hooks I’ve seen have a sloppy fit on the rack.  The reason for this because of the bending a good consistent tolerance can’t be maintained – and thus manufacturers make them loose to insure that they will fit in all cases.  I just hate bar hooks that “swing in the breeze” on a rack.  Every time the bar is moved the bar hook will slide to the side.  Bar hooks should also be of adequate length, but at the same time not too long as to catch the bar as a lifter comes up from a squat.  Short bar hooks are a bigger problem.  A bar hook should be of length to allow a lifter to rack the weight easily.  Another important feature is NO SHARP EDGES.  I have scars on both of my shoulders that occurred as the result of bar hook injuries in the gym.  Both times I wasn’t paying attention and caught the edge of my shoulders on bar hooks attached to the front of the rack.  Add in the number of times I’ve cut the outside of my palms from sharp edges on hooks as I was racking a heavy squat, and you can see why I think this is an important feature.  Bar hooks should also be easy to adjust to different heights, and not require specialized wrenches or tools to do this.  

3.  Elevated bottom cross member

Most of the commercial power racks available DO NOT allow a wide based squatter to get proper foot placement.  A floor cross member interferes with the feet when trying to take a wide stance squat  (often limited to 43″ or 44″ at width).  This problem is easily addressed by raising the bottom cross member  up 12 inches.  That’s it – but for some reason power racks often are not designed that way.   A good power rack should allow for “sumo stance” lifting.

4.  Multiple adjustments

A good power rack should allow for any spacing of the bar hooks or safety supports.  I’ve seen some manufacturers go way overboard with the number of holes they place in their uprights (and make a holey looking rack, haha), but most have hole spacings that are too far apart, thus making it more difficult to get the correct setup for the hooks and supports.  Most serious lifters like their bar height setting for unracking a bar down to an inch of being correct.  I think anything over 2″ spacing is too much.  But placing more holes in tubing is an expensive manufacturing cost – so this is often compromised in providing a top quality product.

5.  Safety supports

A good power rack will have quality safety supports.  Safety supports are the adjustable cross members that will catch the bar in case of a failed lift.  Think of them as your safety net.   They should adjust easily, yet be very sturdy and secure.  Often you will see a rod inserted through the holes of the rack for this.  That is a poor design in my book as no rod is going to stay straight after dropping a loaded bar on it.   Some manufacturers have a pipe that you insert the rod through for the safety supports.  Again that is a cheap poor solution to safety supports.  Safety supports should be strong enough to lift off of – like doing rack pulls.  For this they need to be well made.   Having them lined with rubber to protect the bar is also a good idea, yet most all of them don’t have that.  They should be easy to adjust to different height as well.

6.  Able to take Add-ons

Add-ons for power racks are the new thing amongst the leaders of manufacturers of power racks.  However,  I prefer a power rack that “looks like a power rack” and not cluttered with unneccesary appendages hanging off it at all angles, but I know I’m in the minority on this.   As for the add-ons I’m talking about here – chin up bars, plate storage, bar racks, band/chain peg attachments, land-mine attachments, chain/band storage, dip attachments, front safety supports, med ball bounce plates, etc.  And there’s even more!!!  Before long the  power rack doesn’t even look like a power rack anymore.   Gyms and training facilities like to keep a “clean house” and with all the new training devices being used nowadays, it is hard to find a place to store them so the solution seems to be to just hang them on the power rack.   The important thing here is to have a power rack that has the capability to utilize whatever add-on YOU WANT.

I know I’ve covered a lot here – but Power Racks are something that I’m passionate about.  If anyone ever wants to either discuss power racks, or has specific questions about them just drop me an email (amyers@usawa.com) .  I’m always glad to hear from other power rack enthusiasts!
OTSM Championships UPDATE

by Thom Van Vleck

Now that my Scottish Highland Games has been completed my focus has shifted to the OTSM on December 7th.  So far I have one entry in hand (thank you to Dean Ross) and several who have shown interest.  Here are some updates to the previously posted information.

1.  Shirt deadline: I have promised a shirt for those that enter but I’m going to have to put a deadline on the shirt as they were so popular at my Highland Games…I SOLD OUT!  So, if you are coming and want a shirt I need your shirt size (at the least) by November 15th.  I don’t necessarily need your entry……but that would be nice.  I will take entries on meet day….BUT DON’T EXPECT A SHIRT.

2. Location: The contest will be held at my gym in the basement of my home.  The first year we had 10 lifters, but last year we had fewer.  I can’t justify loading all my equipment up, renting the old school gym, and hauling all the stuff in, then hauling it back out.  It’s a tight fit, but if the weather is nice, one or more events will be outside.

3. Breakfast: It has been a tradition for my contests to eat breakfast at Pancake City before the meet (dutch).  Anyone that wants to weigh in BEFORE breakfast be at my place at 7:30am and please, give me a heads up or you might find me sleeping…or WORSE!  We will then head in to Pancake City for a good, ol’ greasy breakfast or a stack of flapjacks….or BOTH.  If Art comes….THEY HAVE COFFEE!!!!

I hope all the USAWA members will consider coming to the meet!  See you there!

WEBMASTER’S COMMENT:   The entry information and entry form for the 2013 USAWA Old Time Strongman Championships is located under “USAWA Future  Events” in the column to the right. Simply “click” on it to access this important information!

Delaware Valley Open

by Al Myers

2013 DELAWARE VALLEY OPEN POSTAL MEET

MEET RESULTS:

Meet Director:  John Wilmot
Date:  September, 2013
Lifts: Clean and Press – 12″ Base, Swing – Dumbbell, One Arm, Deadlift – 2 Bars
Lifters and Officials:

Lifters using the 3-Official System:
Bill Crozier – Certified Officials Jim Malloy, Scott Schmidt

Lifters using the 1-Official System:
Denny Habecker – Certified Official Judy Habecker
Eric Todd – Certified Official Lance Foster
Lance Foster – Certified Official Eric Todd

Lifters using a non-certified Judge:
Ruth Jackson – Judge Dan Wagman
Dan Wagman – Judge Ruth Jackson
Sam Rogers – Judge Orie Barnett
John Wilmot – Judge Emile LeMoigne
Orie Barnett – Judge Sam Rogers

WOMENS DIVISION

LIFTER AGE BWT C&P Swing DL TOT PTS
Ruth Jackson 51 106 87 50-R 220 357 553

MENS DIVISION

LIFTER AGE BWT C&P Swing DL TOT PTS
Dan Wagman 50 183 180 115-L 520 815 850
Eric Todd 38 260 245 125 520 890 692
Orie Barnett 52 237 180 105 454 739 681
Denny Habecker 71 185 148 70 330 548 676
Sam Rogers 50 205 170 90 314 574 562
John Wilmot 66 215 100 40-R 270 410 447
Lance Foster 47 330 135 55 350 540 431
Bill Crozier 76 207 80 50 180 310 372

NOTES:  AGE is age in years.  BWT is bodyweight in pounds.  All lifts recorded in pounds.  TOT is total weight lifted.  PTS are total adjusted points corrected for age and bodyweight.

Hercules Chained

by Thom Van Vleck

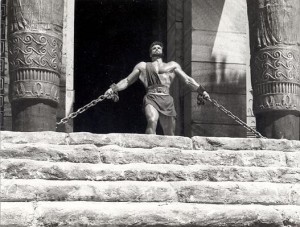
Who can forget Steve Reeves in "Hercules Unchained"using the chains that imprisoned him to then turn the tables and vanquish his enemy.

Have you been workin’ on the Chain Gang?   Well, earlier in this century that would not have been a compliment when prisoners were put to hard, manual labor all while chained to each other or chained to an iron ball to keep them from running away.  The word “Chain” comes from a latin word that referred to a “snare” or “net”.  In Modern times when we think of chains we might think of Chain mail, Chain of stores, or a Chain reaction.  But what I’m talking about today using metal chains to help you get stronger in your lifting.

A few years back I bought 40 feet of half inch chain.  The half inch is the diameter of the rod used to make the chain, which means they were quite big and they weighed about 2lbs a foot.  I initially bought them to use in our strongman shows.  I would do this squat and offer my personal testimony on how my legs had been broken badly and my faith had let to my recovery.  I found that most folks didn’t relate will to a barbell so I bought the chain and draped it over me, the bar and the weights.  I would also use it as an object lesson on how we can become “chained” by lies and sin and forgiveness can set us free from that burden.

Then they started to become more and more popular for training in general. Often they are hung on the ends of barbells or in some way so that as you lift, you slowly pull more and more chain from the floor.  So if I had a 300lb barbell and 100lbs of chains on a squat bar then at the start of the squat you would have 400lbs on your shoulders.  As you went down and the chaines slowly bunch up on the floor you would drop the weight to 300lbs at the bottom.  I think there are several reason they can be a help to training.

First, the practical reasons:

1. Increased stability.  Nothing like a shifting weight to make you work to stabilize the weight.  This is one advantage chains have over using the rubber bands….you are challenges to keep the weight balanced.  One of the reasons barbells are superior to machines is this factor and chains amp that factor up.

2. Speed training.  It’s not uncommon on some lifts, like the squat, to find yourself backing off at the top.  Having the chains increasing the weight as you go up causes you to keep pushing.  My opinion is that increases the efficiency of the lift for the athlete and makes it more useful for those lifting for other reasons than weightlifting competition.

3.  Weak Points.   Chains might help you work on your weak points or sticking points.  Sure, this is debatable but in my mind you basically take one lift with chains and do two lifts at once.  For example, on the bench press you can do a full movement then work on your lock outs with partials….or just do bench’s with chains and increase the load at the top!

Second, the mental impact:

1.  If you use chains and then switch to a regular barbell, the regular barbell will seem easier to handle and increase your confidence.

2.  We can all get stale or stagnant in our training and adding chains can mix things up and bring some freshness to your training.

3.  Finally….let’s face it…chains hanging around your gym look cool and I’ll admit….a couple of times I’ve grabbed a hold of a couple of 8 ft sections of my largest chain and done my best “Steve Reeves” impression!  When I bring people who don’t train regularly to see my gym guess what one of the first things they focus on….the BIG CHAINS.

I’m not making any promises that you will add big pounds to your lifts using chains.  I’m just offering up some ideas to add to your arsenal of training methods.  I wouldn’t…and don’t….use them year around.  I mix them in here and there.   Chains are symbolic in so many ways and they can get your most important training tool inspired and working hard again….YOUR BRAIN.  Get some chains and become Hercules…but CHAINED!

The VBAR has been raised

by Al Myers

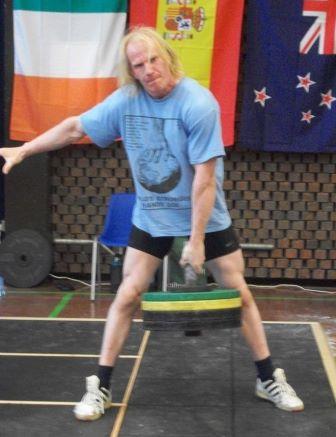
Timo Lauttamus of Finland performing a new ALL TIME overall IAWA record in the Vbar lift at the 2013 IAWA World Championships with a lift of 122.5 KG.

One of the exciting BIG LIFTS of the 2013 IAWA World Championships included a new ALL TIME IAWA RECORD  in the one arm 2″ vertical bar.  Timo Lauttamus of Finland performed a new record lift of 122.5 KG with ease.  I was glad to be able to witness this lift first hand, and see the perfection in which it was performed. This was a fourth attempt for record as he had just previously got 117.5 KG on his third.   For those of you that  get kilogram confused – this comes out to 270 pounds!

Timo is one of the best grip guys I’ve been around.  Pretty much any type of grip-lift he excels in.  The day after the meet I went over to Mark Haydock’s (the meet promoter) gym and he told me that Timo had visited his gym prior to the meet and easily picked up Mark’s Inch Dumbbell replica.  That didn’t surprise me!!!

The IAWA rules for the vertical bar are slightly different than the USAWA rules.  I won’t get into that here as I’ve hashed it over in prior blog stories – but I consider the USAWA rules to be more difficult.  The reason I say this is that the USAWA rules require the VBAR to be raised to the point where the hand is mid-thigh and the length of the VBAR is limited to 18″ maximum.  IAWA rules allow up to a 30″ Vbar to be used and it only needs to be clear of the floor motionless till the down command to be given.  Well – in this comp the Vbar was less than 18″ and Timo lifted it plenty high to pass USAWA rules.  He left NO DOUBT that he is now king of the vertical bar.

1 226 227 228 229 230 463