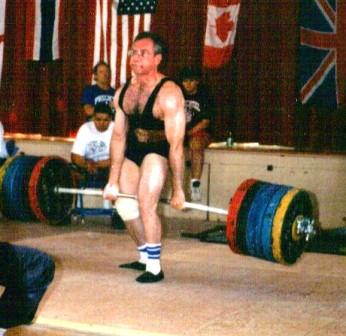
Jefferson Lift Technique
by Al Myers

Bob Hirsh has the ALL TIME best Jefferson Lift in the USAWA, with a lift of 702 pounds in the 80KG class set at the 1996 Buckeye Record Breakers.
I received an email the other day asking a few questions regarding technique for the Jefferson Lift. I thought this was a very appropriate question since the Jefferson Lift will be a big part of our USAWA competitions this year. This lift will be contested in both Nationals and Worlds. The IAWA official name for the Jefferson Lift is the Straddle Deadlift – so these two names are interchangeable. I have heard in the past this lift also called the Kennedy Lift, but that is not entirely correct. The Kennedy Lift is a straddle lift where the bar starts at a higher position than floor level. First, lets go over the USAWA rules for the Jefferson Lift:
18. Jefferson Lift
This lift is also known as the Straddle Deadlift. The rules of the Deadlift apply except that the bar will be lifted between the legs, with a leg on each side of the bar. The lifter may face any direction and feet placement is optional. One hand will grip the bar in front of the lifter while the other hand will grip the bar behind the lifter. The bar may touch the insides of either leg during the lift. The heels are allowed to rise as the bar is lifted, but the feet must not change position. The bar is allowed to change directions or rotate during the lift.
I have seen two techniques for the Jefferson Lift used in competition. I will go over both of these techniques.
1. Shoulders Perpendicular to the Bar
In this technique, the lifter straddles the bar with a foot on each side of the bar with feet in line with the bar. As the bar is lifted, the bar will rotate to some degree at the finish position.
2. Shoulders Parallel to the Bar
In this technique, the lifter sets up for the pull with the shoulders in line with the bar. The feet are slightly off-set as they straddle the bar. The bar comes straight up with very little rotation.
There are advantages to both styles, but I prefer technique number two for several reasons. I feel because it takes the rotation out of the bar it allows a more direct line of pull, and an easier lockout. Technique number one will help with the initial pull from the floor because both legs can be more involved at the start. A problem with tech #2 is that the lead leg will be overloaded at the start, and more strain will be felt in the hamstring of the lead leg. I have pulled a hamstring in this leg before doing the Jefferson. Another important thing is the proper feet placement with tech #2. The toe of the lead leg should be turned slightly in. The back foot should be almost parallel to the bar. Doing this “blocks” any bar rotation as the weight comes up. The width of stance should be of comfortable width – not too wide or too narrow. This is important in order not to hit the inner thighs with the bar as the lift is completed. The back hand (the one behind the lead leg) should have the knuckles facing forward, while the front hand should have knuckles facing away, using an alternate grip. Try to keep the grip as close as comfortable as this will shorten the height the bar has to be lifted. If done correctly with technique #2, there should be very little twisting of the body as the lift is completed. At the end of the pull drive the shoulders up like with a deadlift.
Body mechanics play a big part in the Jefferson Lift. Obviously, having long arms help. I have seen lifters with short arms have serious problems at lockout (OUCH!). You are a natural at the Jefferson Lift if you can match or exceed your best deadlift. I have seen lifters where this is the case. The line of pull is more centered under the body with the Jefferson than a conventional deadlift. Also, the Jefferson is a great training lift. I add it into my “pulling rotation” at least once every 6 weeks.